
Logic Pro X Tutorial: Hidden Features Most Producers Miss in 2025
Most Logic Pro X users overlook its most powerful features, which are hidden in plain sight. This powerhouse digital audio workstation started as Notator Logic more than 30 years ago and still amazes experienced producers today. Logic Pro ranks as the second most popular DAW after Ableton Live, providing exceptional value at $199.99 compared to expensive alternatives like Pro Tools.
Logic Pro 11’s launch in May 2024 brought revolutionary changes to the platform. The new AI-powered session players take the capabilities well beyond the impressive Drummer tool. The software now handles unlimited audio tracks and supports up to 1,000 stereo audio tracks, 1,000 instrument tracks, and 1,000 auxiliary tracks at once. This piece reveals hidden gems that will reshape how you use Logic Pro X 10.7.9 Crack, regardless of your skill level. The revolutionary Stem Splitter, AI-enhanced ChromaGlow, and Mastering Assistant are features that producers should not overlook but often do.
AI Session Players: Beyond the Drummer Plugin
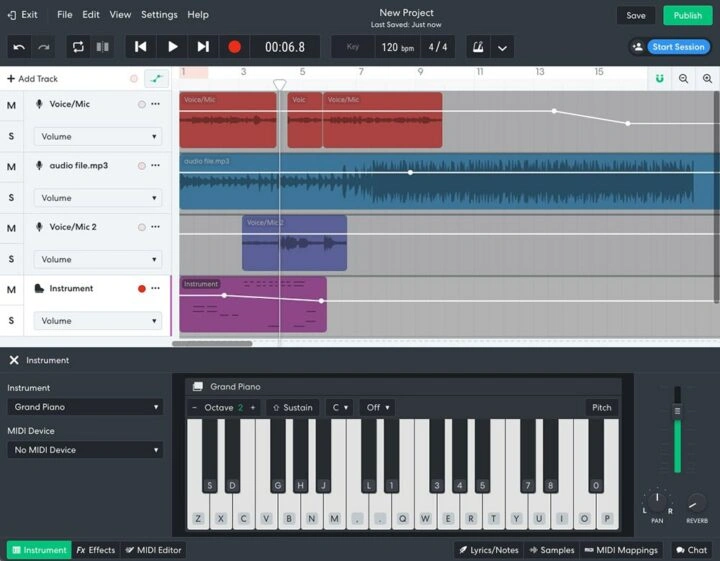
Image Source: Hip Hop Makers
Logic Pro X’s Session Players have come a long way since the Drummer plugin first appeared a decade ago. The software now gives you a complete AI-powered band with Bass and Keyboard Player features. These smart session musicians adapt to your music’s mood and tempo and respond to your input, creating an interactive production experience that feels natural.
Studio Bass and Studio Piano Integration
Your productions can benefit from six carefully sampled bass instruments in Studio Bass. These range from vintage acoustic models to modern electric basses. Each instrument captures a real bassist’s nuances like slides, mutes, dead notes, and pickup hits that make your tracks sound authentic.
Here’s how to add Studio Bass to your project:
- Click the Add Tracks button above the track headers
- Select “Bass Player” in the New Tracks dialog
- Click Create
Logic creates an 8-bar region with the default patch loaded. You can shape the sound through Studio Bass’s detailed controls:
- The pickup positions affect tonal variations
- Mechanical details like string noise and scrapes add character
- Your selected bass type lets you choose between finger style, pick, or slap techniques
Studio Piano brings three acoustic pianos recorded with incredible detail. The Keyboard Player lets you shape every aspect of the piano sound:
- Three microphone positions give you control over the tone
- Mechanical noises like pedal movement and key noise add realism
- Sympathetic resonance between strings creates depth
Top studio musicians helped develop each sound, ensuring professional-quality results even if you’re learning Logic Pro X through a beginner tutorial.
Customizing AI Player Styles and Grooves
Session Players stand out because of their customizable performances. Bass Player has eight distinct playing personalities, each with its musical character. After picking a player, you can shape their performance with:
- The Complexity slider changes how busy or simple the bass part sounds
- The Intensity slider affects the dynamic range and energy
- Pattern selection offers different rhythmic approaches
Keyboard Player gives you four main playing styles:
- Freely creates fluid, expressive playing with natural movement
- Broken Chords makes arpeggiated patterns that outline the harmony
- Block Chords provides solid harmonic support with less movement
- Left/Right Hand controls let you adjust voicing complexity or remove either hand
The session players can follow your drum groove, too. Select “Follow Track” in the Session Player Editor and point to your drum track. This analyzes your drums’ transients and matches the player’s rhythm, creating a tight, unified sound.
You can save time by trying different preset combinations until you find the right match for your project. Any Session Player region can become MIDI for more editing. This gives you both AI-generated ideas and human refinement.
Using Global Chord Track for Dynamic Backing
Session Players’ integration with Logic’s Global Chord Track might be its best feature. This powerful system controls harmony throughout your project.
Here’s how to use it:
- Press G to open the Global Tracks section
- Create or select a chord progression on the Chord Track
- Make sure your Session Players follow the Chord Track
Your Session Players will automatically match their performances to any changes you make in the Global Chord Track. This creates a backing band that responds right away to your harmonic changes.
Advanced productions allow you to:
- Create different chord progressions for individual Session Player regions
- Use region-specific chords that override the Global Chord Track
- Move chord progressions between areas or between the Chord Track and regions
The project’s key signature changes will relatively transpose all chords. This helps when you need practice tracks or want to find the perfect key for a vocalist.
Session Players bridge the gap between programming and live performance. They offer a sophisticated yet easy-to-use approach to creating backing tracks. Even experienced Logic Pro X Torrent users might be surprised by what these tools can do.
Stem Splitter: Isolating Tracks from Full Mixes

Image Source: Attack Magazine
Logic Pro’s Stem Splitter has changed the game for producers who work with remixing and sampling. Previously, producers needed expensive plugins or used complex phase cancellation methods to isolate elements from a complete mix. Logic Pro users with Apple Silicon machines can now extract vocals, drums, bass, and other instruments from complete mixes with fantastic clarity.
How to Extract Vocals, Drums, and Instruments
The Stem Splitter is easy to use. Here’s what you need to do:
- Import your audio file into Logic Pro
- Select the audio region in the Main window
- Right-click and choose processing> Stem Splitter (or find it in the Functions menu)
- The Stem Splitter window lets you pick which elements to extract by checking these boxes:
- Vocals – lead and background vocals [virtual ]
- Drums – all percussion elements
- Bass – bass guitar and low-frequency instruments
- Other – guitars, keyboards, and remaining instruments
- Click “Split” and wait a bit (about 30 seconds for most songs)
Logic Pro then creates a summing stack with separate tracks for each element you chose. Your original region gets muted automatically, so you can hear your extracted stems immediately. This feature works thanks to machine learning technology built into Apple’s M-series processors, which explains why you’ll only find it on Apple Silicon machines.
You can also use presets if you want quick extractions. Each preset name tells you which stems are separated and which combine into submixes. This helps beginners who are still learning Logic Pro’s basics.
The separation quality is quite clean, though some parts can be tricky. Vocals usually separate well, with just a few subtle artifacts here and there. Drums come out clean, but crash and ride cymbals might sound slightly different. Bass notes separate nicely, though higher harmonics sometimes end up in the “Other” category.
Use Cases for Remixing and Sampling
Stem Splitter’s practical uses go way beyond just experimenting. Producers have found many creative ways to use this feature:
Creating Instrumentals and A Cappellas. You’ll get a clean instrumental version of your song when you mute the vocal track. You can also isolate the vocals to create a cappella for remixes or new songs. These extracted vocals keep their original effects like reverb or delay, though they might lose some quality.
Remastering and Enhancement. After separation, you can process each element on its own:
- Add compression and EQ to beef up thin drums
- Fix vocal pitch
- Make bass punch through with compression and low-end EQ
- Add stereo effects to specific parts
Remix Creation This tool opens up a world of possibilities for remixers. You can take vocals from one track and mix them with instruments from another. You can also mute specific parts (like drums or bass) and record new ones. This works great for making tracks or creating practice material for musicians.
Sampling and Production Sample-based producers now have more freedom than ever. Instead of sampling whole music sections, you can grab just the drums or bass for your new tracks. These samples blend naturally with new productions.
Learning and Education Stem Splitter helps you learn, too. By isolating them, you can study how instruments are arranged, their patterns, and mixing techniques. This lets you pick apart professional productions and see how everything works together.
Many users say Logic Pro’s Stem Splitter works better than specialized tools like iZotope RX Music Rebalance. This built-in feature saves money for producers who used to rely on expensive plugins. While free options exist (like UVR, Stemroller, and online services), the quality and convenience of Logic Pro’s native solution make it perfect for daily production work.
ChromaGlow: Vintage Saturation with AI Precision
ChromaGlow stands out as one of the most exciting features in Logic Pro 11. This AI-powered saturation plugin recreates the warmth and character of sought-after analog equipment. The plugin uses Apple’s M-series silicon processing power to deliver ultra-realistic warmth, presence, and punch to any track in your mix.
Preset Modes: Clean, Transparent, Valve, Punch
ChromaGlow gives you five distinct saturation models. Each model reproduces specific types of analog hardware:
- Retro Tube – Replicates vintage vacuum tube equipment with warm, even-order harmonics that create smooth, pleasant distortion
- Clean style: Adds subtle warmth with slight muddiness
- Colorful style: Adds notable character with noticeable muddiness
- Modern Tube – Captures the harmonic richness and gentle compression of contemporary tube gear
- Clean style: Delivers pristine sound with just a touch of warmth
- Colorful style: Blends classic warmth with modern clarity
- Magnetic – Mimics analog tape machines with their characteristic compression and organic sound
- Squeeze – Replicates the saturation achieved by intentionally pushing a compressor
- Analog Preamp – Provides an assertive, vibrant sound with a distinctively sharp edge
You can set up ChromaGlow in your project quickly:
- Insert ChromaGlow on your desired channel strip
- Select your preferred model from the dropdown menu
- Adjust the Drive knob to determine saturation intensity
- Fine-tune with the Mix parameter to blend with your original signal
Pro Tip: Squeeze mode works best for vocals. It creates warmth while maintaining clarity.
These core controls shape your sound:
| Control | Function |
|---|---|
| Drive | Sets the amount of saturation applied |
| Bypass Below | Protects low frequencies from saturation |
| Level In/Out | Controls gain staging before/after processing |
| Mix | Balances the wet/dry signal ratio |
ChromaGlow’s real-time visual display shows how your settings affect the signal’s harmonics. This visual feedback helps beginners learn Logic Pro basics and experienced producers achieve precise results.
Logic Pro X: Auto EQ and Dynamics Matching Explained
ChromaGlow’s intelligent approach to saturation sets it apart. Rather than adding harmonics across the entire frequency spectrum, it analyzes your audio to determine where saturation will benefit your sound most.
The Bypass Below feature demonstrates this intelligence. Once activated, it:
- Establishes a frequency threshold below which saturation isn’t applied
- Preserves clarity in your low end while adding character to mids and highs
- Prevents the muddiness often associated with saturating bass frequencies
ChromaGlow’s filtering options allow precise targeting:
- Low and high cut filters determine exactly where saturation is applied
- Pre/post EQ options let you choose whether filtering happens before or after saturation
- Resonance controls add character to filter slopes
This intelligent processing lets you apply saturation to a full mix without losing clarity. Many producers find that applying subtle ChromaGlow processing (10-15% mix) with the Retro setting and about 30% drive creates a warm, tape-like quality that boosts the entire project.
ChromaGlow’s most valuable advantage lies in its adaptability to different sources. Traditional saturation plugins apply the same processing regardless of input. ChromaGlow’s AI-powered approach responds differently to:
- Bass tracks (enhancing fundamental tones while preserving definition)
- Drum busses (adding punch without smearing transients)
- Vocal tracks (introducing warmth while maintaining intelligibility)
- Master buses (providing cohesion without overprocessing)
Explore the presets to start your ChromaGlow experience. Logic Pro provides factory presets for various instruments and scenarios, including bass, drums, guitars, keys, master bus, and vocals.
The real magic of ChromaGlow comes from subtle application across multiple tracks. As one producer noted, “Small doses of ChromaGlow alone might not sound like much. But then bypass every instance… You’ll soon wonder, ‘where did the magic go?'”
Mastering Assistant: One-Click Finalization
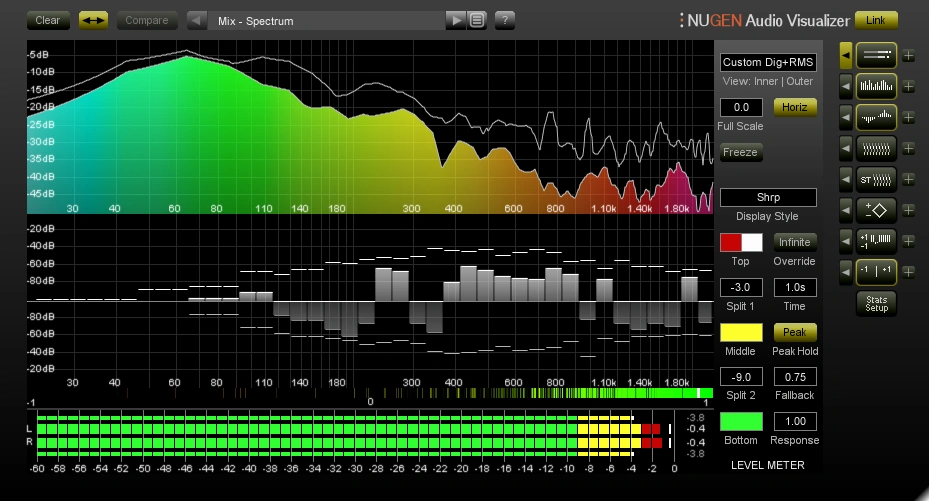
Image Source: NUGEN Audio
Logic Pro 11’s powerful Mastering Assistant makes professional track finishing easier with a one-click solution that removes the guesswork from final mixing. This smart plugin studies your audio and applies the proper EQ, dynamics processing, and stereo enhancements. Your tracks will sound polished on any playback system.
Logic Pro X: Real-Time EQ Visualizer and LUFS Metering
The Mastering Assistant shows you everything you need through its complete visualization tools. The dynamic EQ display on the left side shows the applied EQ curve and a real-time spectral analyzer below it. Your track’s frequency distribution appears as it plays, letting you see the whole spectrum.
You can take complete control of your EQ:
- Adjust the Auto EQ slider to increase or decrease the amount of EQ applied (from 0% to 200% of the analyzed recommendation)
- Toggle the Custom EQ button to enable manual adjustments
- Drag any of the three control points to modify specific frequency bands:
- Low shelf (20Hz-200Hz)
- Midrange (200Hz-8kHz)
- High shelf (8kHz-20kHz)
Each control point moves vertically (±6dB gain) and horizontally (to adjust center frequency). This gives you precise control while maintaining the innovative processing that makes Mastering Assistant effective.
The LUFS metering system delivers industry-standard loudness measurements for modern music distribution. LUFS (Loudness Units relative to Full Scale) shows how humans hear volume, unlike peak meters. The display shows three key measurements:
| Measurement | Description | Display Color |
|---|---|---|
| M (Momentary) | Current momentary loudness | Green (safe) / Yellow (exceeding target) |
| S (Short-term) | Short-term loudness average | Green (safe) / Yellow (exceeding target) |
| I (Integrated) | Overall loudness of the entire track | Green (safe) / Yellow (exceeding target) |
Most streaming platforms target -14 LUFS for playback, which explains the default center position on the Loudness knob. Your tracks will sound consistent across platforms without automatic attenuation.
Logic Pro X: Auto Loudness and Stereo Spread Controls
The Loudness section is the most valuable feature for beginners learning Logic Pro basics. The central Loudness knob adjusts your mix’s overall perceived volume without distortion. The LUFS meters update as you play, showing how your adjustments affect the track’s loudness profile.
The Loudness Compensation button helps you accurately compare processed and unprocessed audio. It matches volume levels when switching between bypassed and processed states, so you can hear actual quality differences.
Here’s how to set the perfect loudness level:
- Set the Loudness knob to center position (-14 LUFS) initially
- Play your track and watch the Integrated (I) LUFS reading
- Adjust the knob based on your distribution target
- Use the Reset button to clear current measurements for a fresh reading
The Width control plays a crucial role. This knob adjusts your mix’s stereo width from fully mono (left position) to enhanced stereo (correct position). The Correlation meter next to it shows your stereo signal’s phase relationship. Readings above zero mean good mono compatibility, while negative values indicate potential phase issues.
Check mono compatibility this way:
- Turn the Width knob entirely left (mono)
- Listen for elements that disappear or change dramatically
- Adjust problematic tracks in your mix if needed
- Return the width to the desired setting for output
These tools work together to create a balanced master. Start with the automatic analysis, make minor adjustments to taste, and compare results using the Loudness Compensation and Bypass buttons.
Here’s a quick reference for target LUFS values on specific platforms:
| Platform | Target LUFS | Notes |
|---|---|---|
| Apple Music | -14 LUFS | Default setting |
| Spotify | -14 LUFS | Similar to most streaming services |
| YouTube | -14 LUFS | Consistent with streaming standards |
| Club/DJ | -8 to -6 LUFS | Higher for live performance contexts |
Logic Pro becomes more than a recording platform with these innovative yet available tools. You now have a complete production studio that delivers release-ready masters.
Sample Alchemy: Turning One Sample into a Synth
Image Source: Waves Audio
Sample Alchemy, one of Logic Pro’s hidden treasures, turns a single audio sample into a fully playable instrument. Unlike standard samplers that play recordings, Sample Alchemy analyzes and blends audio smartly, creating unique sounds you can’t get through regular methods.
Granular vs Additive vs Spectral Synthesis
Sample Alchemy comes with three powerful synthesis engines that work alone or together. Synthesis splits your sample into tiny fragments (grains) between 2 and 230 milliseconds in length. These grains blend and layer to create evolving textures. The main controls are:
- Size: Sets grain duration—shorter grains create choppier, dissonant sounds
- Density: Controls grain overlap—higher settings give smoother textures
- Random Time: Adds variety to grain start points and creates warmer sounds
- Random Pan: Spreads grains across the stereo field for spatial effects. Synthesis creates sounds by combining multiple sine waves at different frequencies. This method matches how acoustic instruments naturally make sound. The main controls include:
- Odd/Even: Shapes harmonic content—odd harmonics create darker tones, even harmonics give brighter sounds
- Fundamental: Changes the root pitch strength
- Partials: Sets the number of harmonics—more partials sound closer to the original synthesis. Synthesis rebuilds your sample’s frequency spectrum. It splits pitched elements (replaced by sine waves) from percussive elements (replaced by white noise). This opens up excellent transformation options through effects like:
- Bloom: Creates frequency bursts from the source sound
- Cloud: Makes a “cloud” of frequency grains
- Metalize: Adds metallic resonances for brassy, edgy textures
Playback Modes: Loop, Scrub, Bow, Arp
Sample Alchemy gives you five different ways to play your resynthesized sounds:
Classic Mode plays the sample from start to finish when triggered.
Loop Mode lets you set up to two looping sections in your sample. You can place handles on the waveform to set loop points and adjust the Loop Speed to change playback tempo. This works great for making rhythmic patterns from melodic samples.
Scrub Mode copies tape scrubbing techniques. You can move handles across the waveform to trigger specific points. The Scrub Jitter parameter adds randomization for unison-like effects.
Bow Mode copies string instrument bowing. The sample plays back and forth at each handle position—forward on upstrokes, reversed on downstrokes. Bow Rate controls motion speed and syncs to your project tempo.
Arp Mode creates arpeggiated patterns from your sample. Different sections trigger in sequence based on played notes, which makes intricate sequences. Arp Speed sets the pattern rate and syncs to your project tempo.
You can turn any audio into a playable instrument by:
- Loading Sample Alchemy
- Importing your audio file
- Selecting synthesis methods (granular/additive/spectral)
- Picking a playback mode
- Adjusting parameters as needed
Beginners should start with loop mode on drum samples or scrub mode on atmospheric sounds. This will quickly show them Sample Alchemy’s potential.
Beat Breaker: Real-Time Audio Slicing and FX
Image Source: macProVideo.com
Beat Breaker is Logic Pro’s most creative immediate effect, changing how producers manipulate audio while playing. Traditional editors need pre-planning, but Beat Breaker cuts incoming audio in real time. This lets you rearrange, repeat, and reshape sounds as they play.
The plugin has three sections: Edit Mode buttons at the top, waveform display in the middle, and Pattern buttons at the bottom, which allow users to switch between slice arrangements quickly.
Here’s how to start with Beat Breaker:
- Insert Beat Breaker on your desired track
- Play your audio to see it appear in the input buffer
- Adjust slice markers in the Slice Editor strip above the waveform
- Click on individual slices to modify their behavior
Logic Pro X: Creating Glitch and Vinyl Effects
Beat Breaker shines at creating modern glitch effects and vintage vinyl manipulations. You can make classic vinyl scratches by selecting a slice and tweaking its Speed parameter. Negative values create reverse playback that sounds just like manual turntable manipulation.
The Repeat mode turns regular segments into rhythmic subdivisions for EDM-style glitches. Just click the Repeat button to change orange lines to magenta, then drag up on any slice. This creates multiple repetitions that show up as sawtooth zig-zags, making stutter effects without manual editing.
These choppy edits might create unwanted clicks. The De-click parameter fixes this by adding crossfades between slices. Higher values make transitions smoother, while lower values keep the cuts more aggressive.
Logic Pro X: Using Beat Breaker on Pads and Vocals
Despite its rhythmic nature, Beat Breaker works great on sustained sounds like synthesizer pads and vocals. Subtle time manipulations can add gentle rhythmic pulses to atmospheric pads that change throughout a section.
Beat Breaker turns regular vocal phrases into rhythmic elements. Vocal processing often creates noticeable pops, but here’s how to fix that:
- Increase the De-click value (between 50-70%)
- Adjust the Mix parameter to blend processed and unprocessed signals
- Add gentle compression after Beat Breaker to control dynamic spikes
Mix control is a great way to achieve the right balance with any source. Setting it to 25% keeps the original character and adds enough manipulation to make things interesting.
Logic Pro X: Real-Time Bounce in Place for External Gear

Image Source: GRIT.online
Producers today face a common challenge in hybrid production environments. The connection between external hardware and Logic Pro’s digital workflow needs improvement. Understanding up-to-the-minute bouncing will continuously connect analog gear and digital projects.
Logic Pro X: Capturing Hardware Synths and Compressors
Logic Pro processes hardware synths differently from software instruments. The software performs a real-time bounce automatically when audio or MIDI signals route to external devices. Your hardware’s warmth and character will be captured with precision.
Logic Pro records hardware synths through these steps:
- Create an External Instrument track, which handles both MIDI and audio routing
- Connect your synth’s MIDI input to your interface
- Connect the synth’s audio outputs to your interface inputs
- In the External Instrument plugin, select the appropriate MIDI destination and audio input
You can play and record MIDI notes while listening to your hardware synth through Logic. The system captures these parts with their analog qualities intact.
The I/O plugin connects your digital system to outboard compressors or other processors:
- Insert the I/O plugin on your Trac Output to the output connected to your hardware
- Set the input to the physical input that your hardware returns to
- Press the Ping button to detect and compensate for latency automatically
Latency compensation is vital. Without it, processed audio returns with a slight delay, which creates phase issues and timing problems.
Logic Pro X: Workflow for Hybrid Analog-Digital Projects
The quickest way to handle hybrid workflows includes:
- Track creation – Set up dedicated tracks for hardware processing
- Signal routing – Configure I/O plugin or External Instrument
- Latency detection – Use the Ping function before recording
- Real-time bounce – Ensure “Real-time” is selected when bouncing
The I/O plugin’s Dry/Wet control allows parallel processing. You can blend processed and unprocessed signals to create unique effects.
Hardware limitations prevent direct use of “Bounce in Place” commands with external MIDI tracks. The solution lies in real-time bounce through the project bounce function. Another option is recording the audio to a new track while monitoring through your hardware chain.
Logic Pro X: Slip and Rotate Tools for Region Editing
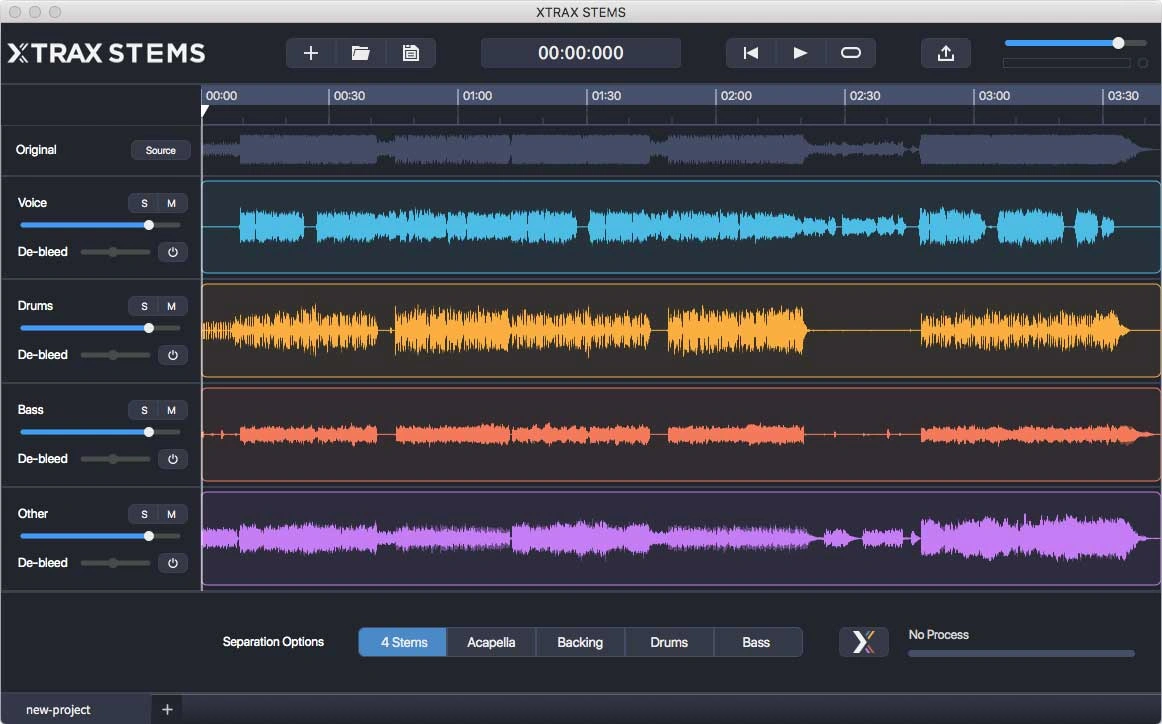
Image Source: Mixonline
Logic Pro X’s slip and rotate tools give you powerful editing options, yet many producers don’t use them to fix timing issues. These tools let you manipulate audio within region boundaries without changing your original recordings.
Non-Destructive Audio Moving Techniques
Traditional editing of recorded material often needs cutting, moving, and crossfading regions. This approach can damage your audio by creating clicks or ruining natural transitions. The slip tool gives you a better way to move content inside a stationary region.
The slip tool works like this:
- Select the region you want to adjust
- Activate the slip tool (keyboard shortcut: E)
- Click and drag left or right to move content within the region boundaries
- Release when positioned correctly
You should know this limitation: you can only slip content when your source material is longer than the region by at least the amount you’re adjusting. This means you need “handles” (extra recorded material) beyond your visible regions for vocal recordings.
The rotate tool works like the slip tool, but there is one vital difference. Content that moves past one edge shows up on the opposite side, creating a looping effect. This makes it great for drum loops and repetitive elements. Logic Pro turns rotated audio regions into one-track folders with two regions, shown by a folder icon in the upper-left corner.
Better Timing Without Cutting Regions
These tools are a great way to gain advantages over Flex Time, which sometimes adds unwanted artifacts or tempo changes. Instead of using complex algorithms, you get precise control while keeping audio quality intact.
Here’s how to fix guitar timing without Flex:
- Isolate the problematic section using the scissors tool
- Apply the slip tool to adjust the timing
- Create crossfades between regions if needed
This method works well with guitar or bass recordings, especially when flex time might hurt the tonal quality. The core team learning Logic Pro basics will find that these tools improve their editing speed.
Moreover, the slip and rotate tools work great with MIDI regions. You can adjust timing without changing region boundaries. Logic Pro first changes Session Player regions to standard MIDI regions before making these adjustments.
These tools help you become skilled at precision editing in Logic Pro X. You’ll solve timing problems while maintaining pristine audio quality.
Conclusion
Become Skilled at Logic Pro X’s Hidden Potential

Logic Pro X never fails to amaze both new and experienced producers. Our deep dive into its hidden features reveals powerful tools that boost production capabilities without expensive third-party plugins.
AI Session Players are true game-changers for composition. They work like a virtual band that responds to your chord progressions and musical direction. The Stem Splitter, one of the most groundbreaking additions, changes how we approach remixing and sampling. It cleanly pulls individual elements from complete mixes.
ChromaGlow brings analog warmth with digital precision, and Mastering Assistant makes professional-quality finalization available to beginners. Sample Alchemy elevates sound design by turning simple audio clips into complex, evolving instruments through granular additive synthesis.
Beat Breaker revolutionizes live audio manipulation, unlocking creative possibilities that once needed tedious offline editing. Live bounce capabilities solve the age-old challenge of combining hardware with digital processes. The slip and rotate tools fix timing issues smoothly without destructive editing.
These features pack tremendous value into Logic Pro’s budget-friendly price point. Each tool shines on its own, but their full potential emerges when you combine them in your production process. To name just one example, start with AI Session Players for your foundation, add ChromaGlow processing to individual elements, shape rhythms with Beat Breaker, and polish everything with Mastering Assistant. This creates a smooth workflow from concept to final track.
Next time you open Logic Pro X, explore these hidden gems. Your experience level doesn’t matter – these tools will expand your creative horizons and simplify your production process. The best DAW isn’t the one with the most features. It’s the one whose features you understand and know how to use effectively.
Logic Pro X: FAQs
Q1. Is Logic Pro still being actively developed?
Yes, Logic Pro is still actively developed and supported by Apple. Although the “X” was dropped from the name in 2020, it’s a continuation of the same software. Apple regularly releases updates with new features and improvements.
Q2. What are some effective ways to learn Logic Pro?
There are several effective ways to learn Logic Pro:
- Use the built-in interactive tutorials in Logic Pro
- Watch YouTube tutorial series by channels like Music Tech Help Guy
- Practice regularly by working on your projects
- Refer to the official Logic Pro User Guide when needed
- Join online communities to ask questions and learn from others
Q3. How can I use Logic Pro Mastering?
Logic Pro includes a Mastering Assistant feature that analyzes your track and suggests optimal settings. You can then fine-tune the results using the built-in EQ, compression, and limiting tools. The LUFS metering helps ensure your master meets modern loudness standards for various platforms.
Q4. What are some hidden features in Logic Pro that beginners often miss?
Some hidden features in Logic Pro that beginners often overlook include:
- The Stem Splitter for isolating elements from complete mixes
- ChromaGlow for adding analog-style saturation
- Sample Alchemy for transforming samples into complex instruments
- Beat Breaker for real-time audio slicing and manipulation
- The slip and rotate tools for non-destructive audio editing
Q5. Can Logic Pro integrate with external hardware?
Yes, Logic Pro can integrate seamlessly with external hardware. It offers real-time bounce capabilities for recording hardware synths and effects. The I/O plugin allows you to route audio through outboard gear, with automatic latency compensation. This enables a hybrid workflow combining digital and analog elements.