How to Use Halftime Plugin: A Step-by-Step Guide for Beginners
Curious about those dramatic slowdown effects in tracks by Armin van Buuren and David Guetta? They use the halftime plugin – a nifty little tool that costs only $12.
This VST plugin has been part of our production toolkit for years. It’s remarkably simple yet packs a punch when it comes to changing how your audio sounds. The halftime plugin does exactly what its name suggests – it halves your audio speed to create slow, heavy sounds. This works great on melodies, drum loops, or complete tracks. The Cableguys HalfTime VST Torrent version offers three modes—2x, 1.5x, and 4x—so you have plenty of options to stretch time just the way you want.
Want to add some professional time-bending effects to your FL Studio projects or other DAWs? You’re looking at the right guide. We’ll cover everything from getting it installed to cool ways to use it. Don’t worry if you’re new to making music – this guide will help you handle this awesome tool with ease.
What is the HalfTime Plugin?
The HalfTime plugin from Cableguys stands alone as the only VST plugin 100% dedicated to half-speed effects. It works as a specialized audio processor that changes how your music sounds by slowing down playback speed, just like slowing down tape, vinyl, or an old-school sampler.
This plugin stands out because it focuses on just one effect that producers love to use. HalfTime doesn’t try to do everything—it does one thing well: it turns any audio into a darker, slower version, adding huge mood and atmosphere to your tracks.
When you put HalfTime on your audio, it doesn’t just stretch time while keeping the pitch the same (like most time-stretching tools). Instead, it slows the playback speed, which stretches the audio and lowers the pitch at the same time. This gives you high-quality results that stay true to the original sound, without the weird artifacts you often get with pitch-shifting or timestretching.
How the HalfTime plugin transforms audio
The cool thing about HalfTime is how it completely changes different audio elements:
- Transforming melodies: Simple piano lines turn into eerie trap melodies that sound nothing like what you started with
- Enhancing percussion: Drums get thicker and wider, showing you rhythm patterns you might never have thought of
- Creating bass monsters: Lead synths change into heavy EDM bass sounds that give your mix more depth
- Adding atmosphere: Any audio gets spacious and moody, totally changing how it feels emotionally
The plugin doesn’t process your whole track at half-speed forever (which would make a 3-minute song into a 6-minute one). It resets its reading position based on your Loop setting. For example, with a 1-bar loop length, HalfTime takes the first half of each bar, then plays it back at half-speed to fill a full bar.
You get three different speed modes:
- 2x Mode: The standard half-speed effect (what most people use)
- 1.5x Mode: Makes tight harmonies and shuffling swing rhythms
- 4x Mode: Gives super slow, drugged-out playback for extreme effects
HalfTime also has cool controls like Band Split, which lets you slow down only certain frequency ranges (bass, mids, or highs) while leaving other frequencies alone. This means you can create deep bass movement, fatten up your mid-range drums, or just change your high-end elements.
The plugin works great on loops, virtual instruments, or even live audio, making it useful across many production styles. You can also create smooth fades through automation or with the built-in Fade In and Fade Out handles, letting you blend transitions perfectly into your arrangements.

Image from Crackist.com
Genres where the HalfTime plugin is commonly used
While many think this effect is mainly for trap, the HalfTime plugin works great across many genres. According to the developers and user reviews, this effect shines in:
- Trap: Making those spooky, slowed-down melodies the genre is known for
- EDM: Turning lead synths into powerful bass elements
- Hip-Hop: Adding atmosphere and weight to beats and samples
- Techno: Creating dramatic breakdowns and transitions
- House: Adding variation to melodic elements
Beyond these main genres, producers also use HalfTime successfully in:
- Dubstep
- Lo-fi
- Boom bap
- Even country music
The plugin has gotten lots of industry recognition, with notable artists incorporating it into their production toolkit. Besides Armin van Buuren and David Guetta, members of 808 Mafia, The Chemical Brothers, and many other famous producers use it too.
What makes HalfTime so valuable is how it creates variety without needing complex countermelodies. As one producer says, “Most of the time it just makes it sound more lit or gives you variety without adding an actual counter-melody”. This simple way of changing your sound explains why it’s become such an important tool in modern music production across pretty much every electronic and urban genre.
How to Download and Install HalfTime Plugin
Getting HalfTime to work on your computer is pretty easy, no matter what system you use. Let me show you where to find this tool and how to set it up on Windows or Mac.
Where to get the HalfTime plugin
You can grab the HalfTime plugin from a few different places, but for safety and to make sure you get the real deal, here’s where I suggest looking:
- Official Cableguys Website: Your best bet is going straight to the source at cableguys.com/halftime. They offer both the paid version and a free trial.
- Plugin Boutique: This store sells the Cableguys HalfTime plugin too, and sometimes has sales.
- Splice: Another good place to find the HalfTime VST/AU plugin.
Want to try before you buy? The Halftime Plugin Free trial works perfectly fine with no time limits. You’ll just face two small restrictions: you can only use it once per song, and you can’t save your settings. This gives you plenty of chances to test it out before spending money.
Installation steps for Windows and Mac
For Windows:
- Download the HalfTime installer (version 1.1.11 or newer) from the Cableguys website.
- Make sure your PC runs Windows 7 or later
- Double-click the installer and follow what it tells you
- Pick which plugin formats you want (VST2, VST3, or AAX)
- Finish the installation
- The first time you use the full version, you’ll need your license file to activate it
For Mac:
- Download the Mac version (needs macOS 10.9 or later)
- Double-click the installer package and follow the steps
- Important: Restart your Mac when you’re done
- The plugin works with both Intel Macs and Apple Silicon machines
When installing on Mac, you might want to choose which plugin formats to install. Audio Units (AU) work best with Logic Pro and Mac-specific DAWs, while VST formats work with many different programs.
After installation, the plugin should show up automatically in your DAW’s plugin list. HalfTime works with most popular DAWs, including:
- Ableton Live
- Logic Pro
- Pro Tools 12
- Cubase
- Bitwig Studio
- FL Studio
- REAPER
- Studio One
Troubleshooting Mac Installation:
If you don’t see the plugin in your DAW (especially on Mac), try these fixes:
- Logic Pro X users: Look for it in the Audio FX menu
- Some HalfTime versions only work with stereo tracks (Logic makes mono tracks by default)
- Check if it’s listed and turned on in Logic’s Preferences > Plug-in Manager
- Make sure it’s in the right folder: ~/Library/Audio/Plug-Ins/VST
Some users on macOS Mojave say that if the plugin doesn’t show up in Logic right away, it might appear after waiting about an hour.
Once you’ve got everything installed and activated, you’re ready to start using HalfTime. Next, I’ll show you how to set it up in FL Studio, which is one of the most popular DAWs right now.
Setting Up the HalfTime plugin in FL Studio
 Free Download")
Image Source: YouTube
Got HalfTime installed on your computer? Good. Now you’ll need to get FL Studio to recognize it. This takes a few extra steps, but it’s worth doing right so you can quickly apply those time-warping effects whenever you want. Let’s look at how to set up HalfTime in your FL Studio projects.
Scanning for new plugins
FL Studio won’t automatically know about your new HalfTime plugin until you tell it to look. Here’s how:
- Start FL Studio and go to the top menu
- Click on Options > Manage Plugins to open the Plugin Manager
- Look at the bottom of the window and click Find More Plugins
- Wait while FL Studio scans – this might take a while if you have lots of plugins
Can’t see HalfTime in your list after scanning? Check where you installed it. FL Studio looks in specific folders:
“FL Studio needs to find the plugin before it can be used, so check that the ‘VST Plugins extra search folder’ in FL Studio’s Preferences is the one that you installed the plugin to. Then restart FL Studio.”
Still having problems? Try these fixes:
- Make sure your installation folder matches where FL Studio looks for VSTs
- Close FL Studio completely and restart it
- Check if your FL Studio version works with HalfTime
- See if you need any system updates
Adding HalfTime to your mixer or channel rack
Once FL Studio finds HalfTime, you can add it to your project in two main ways:
Method 1: Adding to the Mixer Track
This way lets you use HalfTime on multiple sounds at once:
- Open the Mixer panel (hit F9)
- Click on an empty mixer slot or pick a track with the sound you want to change.
- Click an empty effect slot at the top of the mixer
- Find HalfTime in your plugin list and select it
- The HalfTime window will pop up ready to use
This method is great when you want to slow down a group of instruments or a whole section of your track. You can also control how much effect to apply using the mixer’s blend knobs.
Method 2: Adding to the Channel Rack
You can also add HalfTime directly to just one sound:
- Right-click on the instrument in the Channel Rack
- Choose “Browse Effects.”
- Find and pick HalfTime
- The plugin window will open
As one producer says, “Simply drag it into your mixer or channel rack, and you’re ready to start using it.”
Want to make sure your HalfTime effects show up when you export? Try this tip from producers: “Yeah, make sure you have enabled master effects on when you export, it’s an option towards the bottom of the render window. Alternatively, you can put the halftime on the mixer track(s) of the melody and consolidate the pattern (Ctrl + Alt + C with the pattern selected).”
You can use HalfTime on:
- Just one instrument: Great for slowing down only a melody or bass line
- Groups of sounds: Perfect for processing drums or synth layers together
- Your whole track: Creates awesome breakdowns and transitions
Here’s a handy trick: if you want to bake the HalfTime effect into a pattern rather than running it live, use the consolidate feature (Ctrl + Alt + C) after adding HalfTime to your mixer track.
The plugin quickly becomes one of your go-to tools, ready to transform any sound with that distinctive half-speed effect.
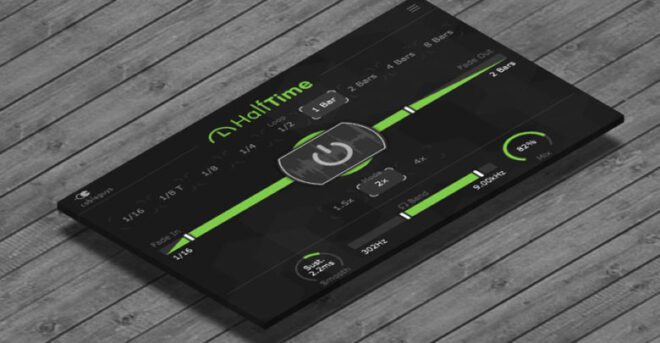
Understanding the Interface and Controls
Got HalfTime set up in your DAW? Let’s check out its interface and controls. The clean layout makes this plugin super easy to use. Even if you’re new to music production, you’ll create professional half-speed effects without breaking a sweat.
Power button and activation
Right in the middle of the plugin window sits a large Power button. This eye-catching control lets you switch the effect on and off. Unlike regular bypass buttons you find in other plugins, this one works a bit differently:
The power button only works when your DAW is playing music. You’ll notice text saying “Bypassed while playback is stopped” on the interface. This neat feature saves your computer’s processing power when you’re not actively playing your project.
Many producers love how you can automate this power button. Just set it to turn on and off at specific points in your track to create cool transitions without messing with complex automation curves.
This button also plays nicely with the fade settings. Click it during an active fade and it actually flips the direction of the fade – pretty handy for creative control.
Loop length and fade options
The Loop length setting controls exactly how HalfTime processes your audio. The plugin doesn’t just slow down your entire track forever. Instead, it resets based on your loop length choice, so it stays in sync with your song.
Loop lengths range from tiny 1/16 notes to 8 bars, each giving you different effects:
- 2, 4, 8 Bars: Great for slowing down longer passages, like tape or vinyl effects that keep your original phrasing
- 1/4, 1/2, 1 Bar: Perfect for weird groove changes with sometimes surprising results
- 1/16, 1/8T, 1/8: Best for pitching loops down without changing their length
My tests show that when processing a full loop, set the loop length to double its original length. So a 2-bar loop works best with a 4-bar setting in HalfTime.
The Fade options give you both fade-in and fade-out handles. These control how fast the effect transitions between dry and wet sounds. Set them anywhere from “fast” (almost instant) to a full 16 bars for super gradual changes. This saves you from drawing automation curves in your DAW.
Using fade-in is simple – pick a value between fast and 16 bars, then hit or automate the power button. The effect gradually appears. The fade-out setting works the same way but controls how the effect disappears.
Dry/Wet mix and band split
The Mix knob blends your original sound (0%) with the processed HalfTime signal (100%). This simple control helps create subtle variations or thicken sounds without completely changing them.
Many producers suggest automating this Mix parameter throughout your track for dynamic effect changes. With short loop times, blending some dry signal creates cool octave-down effects that fatten any sound, even drums.
The Band Split feature might be HalfTime’s coolest tool. It lets you slow down only specific frequency ranges while leaving others alone. Process just the bass, mids, or treble by dragging the green slider or white handles to your desired range.
The displays on the left and right show your high and low cutoff frequencies. Hold Shift while moving the handles for precise tweaks. The Band Solo button lets you hear only the processed frequencies, which works great with the Mix control to blend filtered HalfTime audio with your original signal.
Sometimes I use this feature to create deep bass movement while keeping my high-end percussion crisp, or to make just the mid-range sounds trippy while my bassline groove stays intact.
Using the HalfTime plugin on Different Sounds
The HalfTime plugin works wonders on all kinds of audio elements. It turns ordinary sounds into something completely new. Producers love this tool because it creates unique effects depending on what sound you feed it.
Applying to melodies and vocals
Magic happens when you put HalfTime on melody parts. Regular piano lines suddenly become spooky trap melodies with a dreamy feel, totally changing how your track feels emotionally. Many producers point out that “Plinky piano lines become haunting slow-mo trap melodies”.
Try these melody tricks:
- Stick with 2x mode first for that classic half-speed sound
- Play around with loop timing to discover cool rhythm patterns
- Got a melody with too many notes? HalfTime simplifies it while keeping the main musical idea.
Vocals sound pretty amazing through HalfTime, too. The plugin slows the vocals down and drops the pitch at the same time, making them moody and atmospheric, perfect for trap and electronic music. You might want to use the band split feature to keep some clarity in the high frequencies while slowing down the main body of the vocals.
Want harmonizer effects on vocals? Try blending the processed signal with the original using the Mix knob. This makes a thicker vocal sound that sits below the original, adding richness without completely changing the performance.
Using on drums and basslines
Drums change character when the HalfTime plugin processes them. The developers explain that “Percussion thickens, expanding to reveal new rhythmic possibilities”. Put this plugin on drum loops and you’ll get brand new patterns you probably wouldn’t have thought of yourself.
Some drum processing ideas:
- Full Kit Processing: Put HalfTime on your whole drum bus for a complete rhythm change
- Isolated Processing: Use it on just hi-hats or snares for targeted effects
- Band Split Application: Process only the low frequencies to keep crisp highs while making kicks heavier
The “Perc.” setting in the Smooth control works great for drums since it “fades in the dry signal just before each Loop begins, so there are no missing transients at the Loop points”.
Basslines probably show the most dramatic change. Lead synths “mutate into heavyweight EDM bass monsters” with HalfTime. The band split feature lets you “generate deep bass movement” by only targeting low frequencies.
To make powerful bass sounds:
- Start with a basic lead synth
- Apply HalfTime with 2x mode
- Use band split to process only frequencies under 200Hz
- Blend with the original using Mix control for extra definition
The Mix dial matters when processing drums and bass. Using fast loop times and mixing the effect “creates an octave-down effect that thickens any sound”, adding weight without losing the original character.
I’ve tested this plugin on pretty much everything, and almost any sound gets better with HalfTime processing, just in different ways – vocals, synths, drum loops, ambient textures – they all gain unique character changes.
Exploring the HalfTime plugin Speed Modes
 Free Download")
Image Source: Cableguys
One cool thing about the halftime plugin is its different speed modes. Each mode makes your audio sound completely different, giving you more options than just basic half-speed effects.
2x, 1.5x, and 4x modes explained
The Mode control sets how much slowdown and pitch drop happen to your audio. Unlike regular time-stretching that keeps the pitch the same, HalfTime changes both tempo and pitch together, just like slowing down a record or tape.
2x Mode is the plugin’s main setting. It plays your audio at half-speed while dropping the pitch down one octave. This makes that classic half-time effect you hear in so many tracks. Whenever you need that instant slow-down sound, 2x gives you the most natural results.
1.5x Mode does something a bit different. It plays audio at two-thirds speed and lowers the pitch by five semitones (a perfect fifth). This creates two cool effects at once:
- Regular rhythms turn into triplet patterns
- Mix it with the dry signal, and you get perfect fifth harmonies
4x Mode gives you the most extreme change. It slows audio to quarter-speed and drops the pitch two octaves down. This super-slow playback creates dreamy, spaced-out sounds perfect for weird breakdowns or special effects.
When to use each mode
Pick your mode based on what you want to achieve and what sound you’re working with:
Use 2x Mode for:
- Making those half-speed drops in EDM and trap
- Turning melodies into bass sounds
- Standard half-time breakdowns
Try 1.5x Mode when:
- You want triplet/shuffle grooves from normal patterns
- You need perfect fifth harmonies with melodies
- Adding swing to drums (works best with short Loop lengths)
Save 4x Mode for:
- Super dramatic breakdowns and transitions
- Creating spacey, ambient textures
- Weird sound design where you want extreme effects
How you combine mode selection with loop length changes what you get. Using 1.5x Mode with short loop settings creates shuffle grooves, but longer settings make more sustained sounds.
While 2x works best for most tracks, playing with the other modes often leads to happy accidents and unique sounds you’d never find otherwise. Try all three modes on different sounds to see which one transforms your track most interestingly.
Tips for Creative Use of the HalfTime plugin
 Free Download")
Image Source: Morningdew Media
The halftime plugin has lots of creative uses beyond the basics. Let’s look at some cool tricks that can make your music stand out.
Creating breakdowns and transitions
This plugin is perfect for making those attention-grabbing moments in your tracks. Here’s what you can do:
Try automating the Power button to quickly switch between normal and half-speed sounds. This creates those “wow” moments that grab your listeners without needing complex setups. Want something smoother? The Fade In/Out controls let your effect gradually appear over as much as 16 bars.
Here’s a neat trick – sweep the Mix control quickly to jump between normal drums and slowed-down versions. This makes cool fill patterns you’d never think to program yourself. Try timing these changes with your buildups for maximum impact.
Layering with other effects
The real fun starts when you mix halftime with other effects:
Many pros like to blend the original sound with a slowed-down version to add thickness without losing the original feel. This works well on claps and snares to fatten them up.
The band split feature opens up tons of possibilities. You can slow down just the bass frequencies while keeping your highs normal. One clever producer discovered that keeping the band’s solo button on turns the band split into a filter.
Here’s an unusual approach – pitch your sound up an octave first, then use halftime to bring it back down. This sounds different from normal processing – kind of like old tape techniques, but cleaner.
Play around with these ideas and you’ll find your unique sounds that make your tracks stand out from the crowd.
Free Trial, Pricing, and HalfTime plugin Alternatives
Want to test the HalfTime plugin before buying? Good news – you have options. Let’s look at what’s available for free and what alternatives exist.
Is there a free version? [halftime plugin free]
Cableguys doesn’t offer a permanent free version, but they do provide a full-featured trial with no time limit. This means you can test it as long as you need before deciding to purchase. The trial version comes with just two limitations: you can only use one instance per project, and you can’t save your settings. Some users mention occasional audio dropouts in the trial, but this doesn’t seem to be a common issue.
The demo gives you access to everything – all speed modes, band split features, and loop length options. You’ll get the complete experience to decide if it fits your production style. Once you’re ready to commit, buying the full version removes these restrictions.
How much does it cost? [halftime plugin cost]
The HalfTime plugin costs just USD 12.00. This makes it much cheaper than similar tools like Gross Beat, which sells for USD 99.00 when bought separately.
Cableguys sometimes includes HalfTime in special bundles or offers discounts during sales. Most music producers agree it’s an excellent value – “a steal for producers looking to expand their sonic palette”.
Free HalfTime plugin alternatives
If you’re on a tight budget, try these free options that create similar half-speed effects:
- Cymatics Deja Vu: A free time-warping FX plugin with 9 different time-warping settings. Many consider this the closest free alternative to HalfTime.
- Initial Audio SLOWMO: Comes in both free and paid versions, with paid options ranging from USD 10.00 to USD 39.00.
While these alternatives offer similar features, they typically don’t match the polish and precise controls of the original HalfTime plugin. Still, they work well for beginners or anyone with limited funds.
Conclusion halftime plugin
The HalfTime plugin stands out among tools for making electronic music. We’ve seen how this simple VST can turn ordinary sounds into something special using easy controls and flexible settings. Just $12 gets you a tool that can change melodies completely, make drums sound fuller, create monster bass sounds, and add mood to any track, regardless of your experience level.
What makes this plugin great? It does one job extremely well instead of trying to do everything. The three speed options (2x, 1.5x, and 4x) plus features like band splitting give you tons of sound possibilities without needing hours to learn how it works. The smooth automation lets you make those professional transitions and breakdowns that separate amateur tracks from polished ones.
Sure, other plugins exist, but few offer the same mix of low price, great sound quality, and ease of use. The free trial lets you test everything before buying, though most producers quickly realize the small investment pays off after hearing their first results. From trap melodies to EDM drops, hip-hop beats to experimental sounds, this plugin delivers professional results that would normally require complicated sound design techniques.
Halftime VST Free Mac is one of those rare tools that gives back way more than what you pay for – a genuine secret weapon that can turn average productions into tracks that grab listeners’ attention. Next time you’re stuck with a boring melody or searching for that perfect breakdown effect, try slowing things down. It might be exactly what your track needs.
FAQs
Q1. What exactly does the HalfTime plugin do to audio?
The HalfTime plugin slows down audio playback speed, stretching it in time and transposing it down proportionally. This creates a darker, downtempo version of the original sound, similar to slowing down tape or vinyl.
Q2. Can I use HalfTime on different types of audio elements?
Yes, HalfTime can be applied to various audio elements, including melodies, vocals, drums, and basslines. It’s particularly effective for transforming melodies into bass sounds and creating unique rhythmic variations in percussion.
Q3. What are the different speed modes available in HalfTime?
HalfTime offers three speed modes: 2x (standard half-speed effect), 1.5x (creates triplet patterns and perfect fifth harmonies), and 4x (slows audio to quarter-speed for dramatic effects).
Q4. How can I create smooth transitions with HalfTime?
You can create smooth transitions by using the Fade In/Out controls, which allow gradual effect introduction across up to 16 bars. Additionally, automating the Power button or Mix control can create compelling transitions between normal and half-speed audio.
Q5. Is there a free version of HalfTime available?
While there’s no permanent free version, Cableguys offers a fully functional trial version with no time limit. This demo allows one instance per project and doesn’t save settings, but it provides full access to all features for thorough testing before purchase.
This plugin sounds incredible! I love how it simplifies the process of creating professional sound effects. Can’t wait to try it out for my next project!
I’m glad you’re excited about it! This plugin really does make creating sound effects a breeze, and it’s perfect for taking your projects to the next level. I’m sure it’ll bring your next project to life! If you have any questions while using it or want tips on how to get the most out of it, feel free to ask—I’m here to help!
Seru banget topiknya. Di blog saya juga kadang saya tulis review game yang populer di kalangan remaja Pakistan. Salam kenal!Seru banget topiknya. Di blog saya juga kadang saya tulis review game yang populer di kalangan remaja Pakistan. Salam kenal!
Salam kenal! Senang mendengar bahwa kamu juga menulis tentang game yang populer di kalangan remaja Pakistan. Topik itu memang selalu menarik, apalagi kalau bisa menghubungkan tren permainan dengan audiens yang spesifik. Jika ada hal lain yang ingin dibahas atau ide yang ingin dibagikan, jangan ragu untuk berbagi. Semoga blogmu terus berkembang!
This plugin sounds incredible! I love the idea of being able to create professional-quality sound effects quickly. Can’t wait to try it out in my next project! Great post!
Thank you so much for the great feedback! I’m thrilled to hear you’re excited to try the plugin in your next project. It’s definitely a game-changer for creating high-quality sound effects quickly. If you have any questions while using it or need any tips, feel free to reach out. Best of luck with your project!
Wow, this Halftime Plugin sounds amazing! I love how it can help create professional-quality sound effects in just a short amount of time. Can’t wait to try it out on my next project!
I’m glad you’re excited about the Halftime Plugin! It really is a game-changer for creating rich, professional-quality sound effects quickly. Its ability to transform sounds with just a few tweaks can take your project to a whole new level. I’m sure you’ll enjoy experimenting with it. If you ever need tips or run into any questions while using it, feel free to reach out. Best of luck with your next project!